Welcome & Overview
This manual is written for GRID Max. If you're using GRID Lite, some features and options shown here may not be available. Features exclusive to Max are marked with Max.
What is GRID?
GRID is an accessible 8-channel video mixing application designed for VJs, live streamers, and video artists. Mix multiple video sources in real-time with GPU-powered effects, smooth transitions, and hardware controller support.
System Requirements
- CPU: Multi-core processor (4+ cores recommended)
- GPU: Dedicated GPU with WebGL 2.0 support
- RAM: 8GB minimum, 16GB recommended
- Browser: Chrome, Edge, or Opera (required for MIDI/Stream Deck support)
- OS: Windows 10+, macOS 10.14+, or Linux
- Network: Gigabit Ethernet recommended for multi-machine setups
License Tiers
GRID offers two tiers:
GRID Lite Free
- 8 channels (4 per bank)
- 6×6 video grid (36 cells)
- 1 effect slot per bank
- Single output window
- All 20+ transition modes
- Basic keyboard shortcuts
GRID Max £29
- 9×9 video grid (81 cells)
- 3 grid decks (243 total cells)
- 4 effect slots per bank + 4 output effects
- Multiple output windows
- Per-channel effects
- Advanced masking (chroma key, luma key, shapes)
- Recording to file
- 7-day free trial included
Architecture Overview
GRID uses a client-server architecture with three node types that work together over your network.
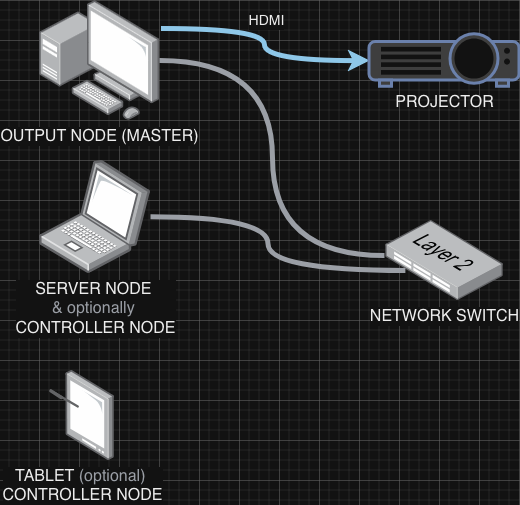
Server Node
The Server Node runs on your main machine and handles:
- Video Library Management: Scans your video folder, generates thumbnails and sprite sheets
- State Synchronization: Keeps all Controller Nodes and Output Nodes in sync via WebSocket
- File Serving: Streams video files to Output Nodes
- License Validation: Manages Lite/Max features and trial status
Controller Node
The Controller Node is the web-based interface for mixing. You can open multiple Controller Nodes on different devices (laptop, tablet, phone) to control the same mixer.
- Video Grid: Browse and select videos from your library
- Mixer Panel: Control channel opacity, effects, and crossfader
- Settings: Configure grid size, effects, hardware controllers
- Hardware Integration: Map MIDI controllers, Stream Deck, OSC
Output Node
The Output Node renders the final composite video using WebGL. This is what you project or stream.
- GPU Rendering: Real-time compositing with effects and transitions
- Fullscreen Mode: Send to projector or capture device
- Master/Secondary: Run multiple Output Nodes for redundancy
- Video Caching: Preloads videos in browser for instant playback
Communication
All three node types communicate in real-time:
- Controller Nodes send commands (e.g., "load video to channel 1") to the Server Node via WebSocket
- Server Node broadcasts state changes to all connected Controller Nodes and Output Nodes
- Output Nodes report performance metrics (FPS, dropped frames) back to Controller Nodes
Basic Workflow
1. Start the Server
Launch the GRID application. The Server Launcher window shows the current status and provides access to all connected nodes.
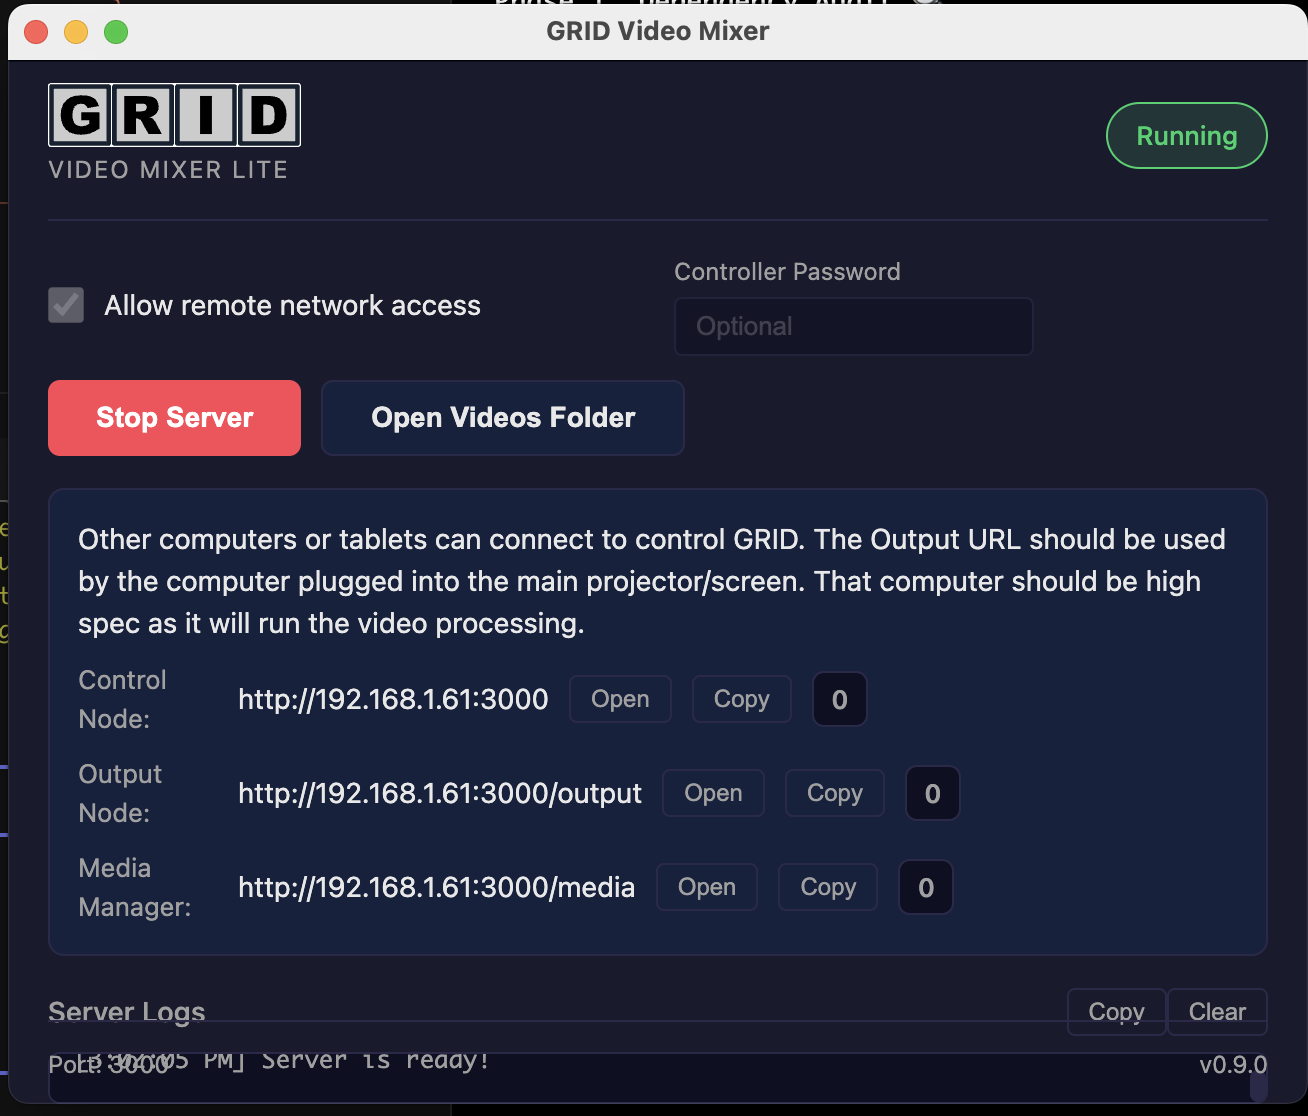
Server Launcher Features
- Status Badge: Shows whether the server is Running or Stopped
- Version Display: Shows your current GRID edition (LITE or MAX)
- Allow Remote Network Access: Enable this to allow other computers/tablets on your network to connect to GRID. When enabled, the server will show your local IP address instead of localhost
- Controller Password: Optional password protection for Controller access
- Start/Stop Server: Control the GRID server
- Open Videos Folder: Quick access to your media library folder
- Control Node: The main mixing interface. Click Open to launch in your browser, or Copy to share the URL with other devices. The number shows connected controllers
- Output Node: The video output renderer for projectors/screens. This should run on a high-spec computer as it handles all video processing. The number shows connected outputs
- Media Manager: Upload and organize your video library. The number shows total videos in your media folder
- Server Logs: View real-time server activity. Click Copy to copy logs for troubleshooting, or Clear to reset the log view
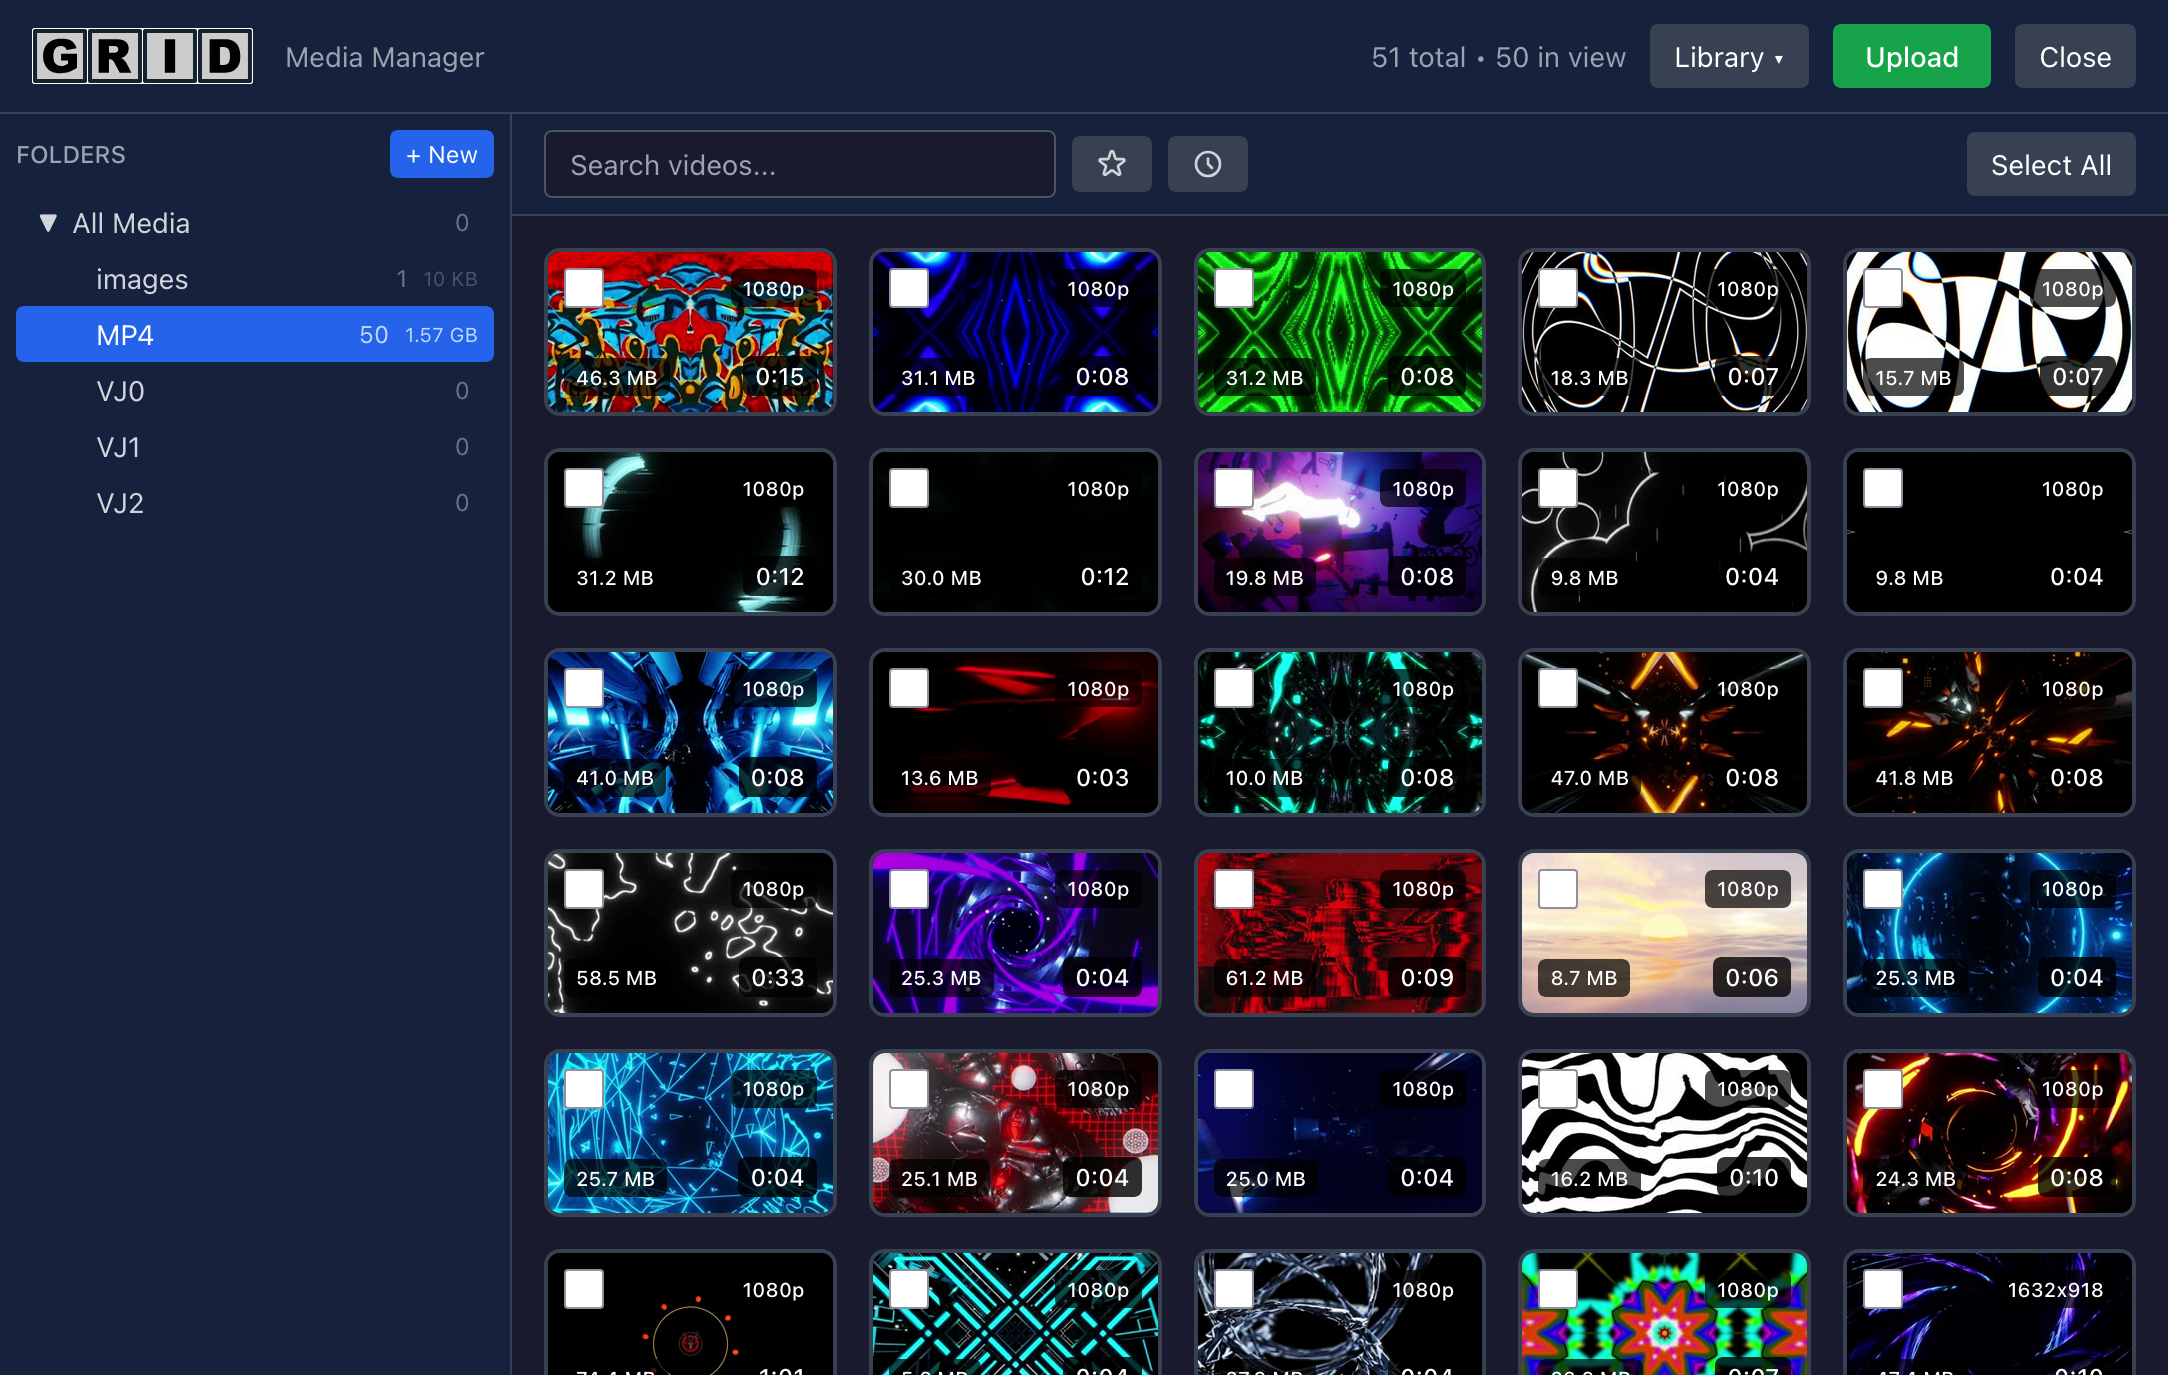
2. Add Videos to Library
Click Media in the header to open the Media Manager.
- Drag video files into the upload area, or
- Set a video folder in Settings and let GRID scan it
- Wait for sprite sheets to generate (shows animated thumbnails)
3. Open the Output Window
Click Output in the header. A new window opens at /output. This is your video output.
- Click the fullscreen button or press F to go fullscreen
- Send this window to your projector or capture device
4. Load Videos to Channels
Back in the Controller:
- Select a video from the grid (left side)
- Press 1-8 to assign it to a channel, or press Space for quick-assign
- The video thumbnail appears on the channel strip
5. Mix with Opacity Faders
Each channel has a vertical opacity fader:
- Drag fader up to increase opacity (make video visible)
- Drag down to decrease opacity (fade out)
- Scroll mouse wheel for fine control
6. Crossfade Between Banks
GRID has two banks: Bank A (channels 1-4) and Bank B (channels 5-8).
- Load videos into both banks
- Use the crossfader slider to blend between banks
- Left = Bank A, Right = Bank B, Center = 50/50 mix
- Press , to auto-fade to Bank A or . to auto-fade to Bank B
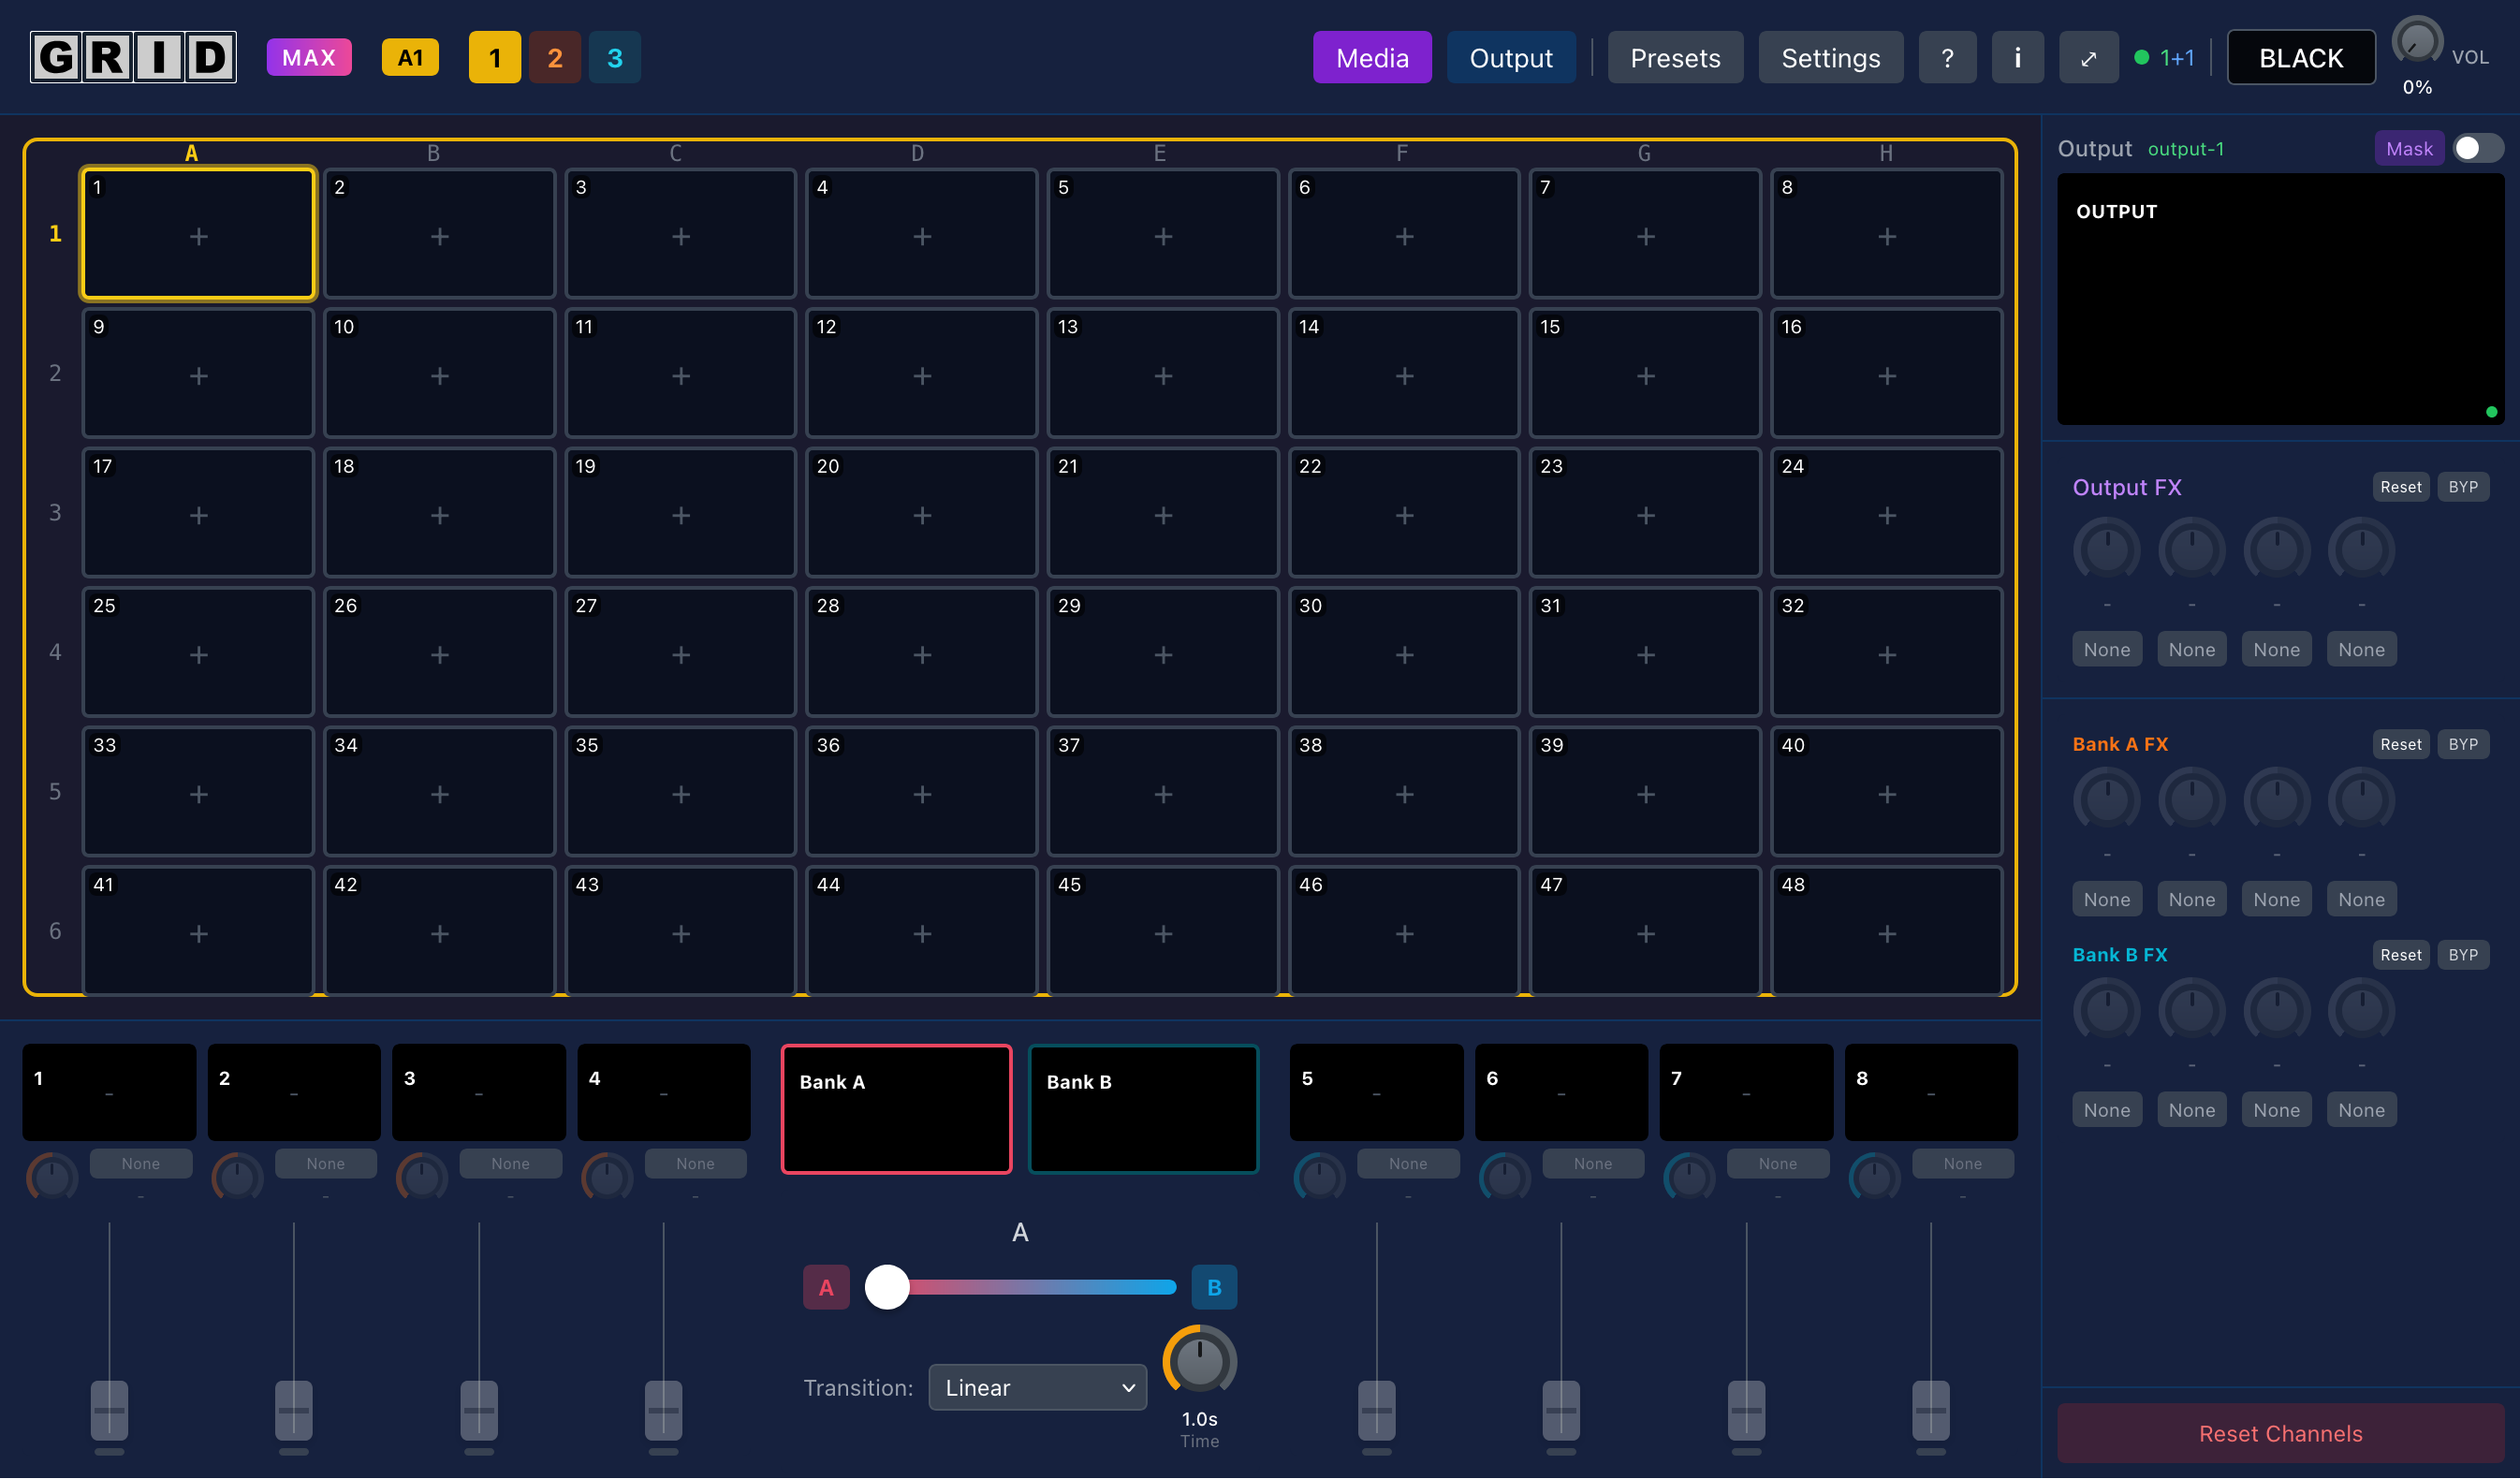
Main Interface Layout
The Controller interface has four main areas:
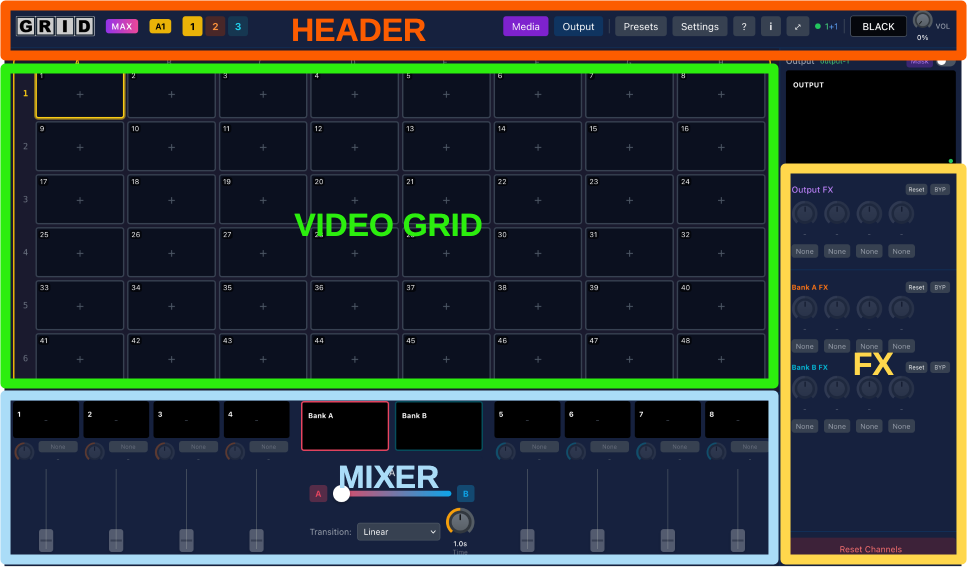
1. Video Grid (Left)
Browse and select videos from your library.
- Animated sprite sheet thumbnails
- Folder navigation
- Grid size: 1×1 up to 9×9 (Max tier)
- Multi-deck support (up to 3 decks)
2. Mixer Section (Center)
Control your 8 channels organized into two banks:
- Bank A: Channels 1-4 (orange accent)
- Bank B: Channels 5-8 (cyan accent)
- Each channel has: opacity fader, effects, mask controls, audio volume
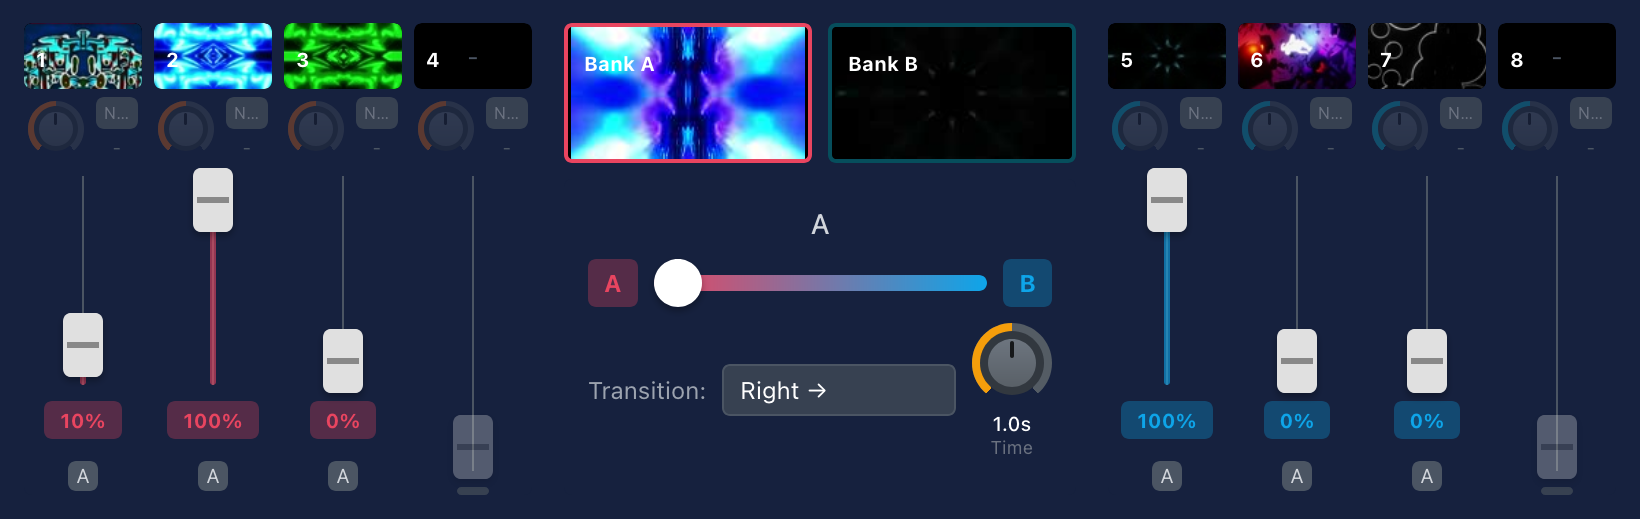
3. Crossfader & Previews (Right)
- Bank Previews: Live composite preview of each bank
- Crossfader: Blend between Bank A and Bank B
- Transition Mode: Select from 20+ transition types
- Output Preview: Final mixed output preview
4. Header Tools
- Media: Open Media Manager in new window
- Output: Open Output window
- Record: Start/stop recording Max
- Presets: Save/load mixer configurations
- Settings: Configure grid, effects, hardware
- ?: Keyboard shortcuts help
- Performance: FPS counter and connection status
Video Grid Navigation
The video grid is your video library browser. Videos are displayed with animated sprite sheet previews.
Grid Size
Configure grid dimensions in Settings → Grid & Channels. Grid cells are labeled with their column letter (A-I) and row number (1-9), such as A1, B2, C3, etc.:
- Columns: 1-9 (labeled A-I)
- Rows: 1-9
- Lite tier: max 6×6 (36 cells, A1 through F6)
- Max tier: up to 9×9 (81 cells, A1 through I9)
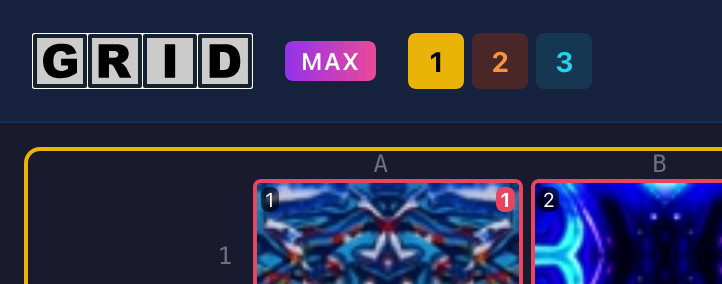
Multi-Deck Support
Grid Decks are separate pages of video assignments Max
- Configure 1-3 decks in Settings
- Switch decks with buttons in header (color-coded: yellow, orange, cyan)
- Keyboard shortcuts: Shift+1/2/3
- Each deck has independent video assignments
Selecting Videos
Use keyboard shortcuts for fast selection. Cells are labeled with their column letter and row number (A1, B2, C3, etc.):
- A-I to select column
- 1-9 to select row
- Example: Press C then 5 to select cell C5
- Arrow keys to navigate selected cell
- Esc to clear selection
Sprite Sheet Previews
Videos show animated thumbnails extracted from the video:
- Automatically generated when videos are added
- Can be disabled in Settings → Performance for better performance
- Regenerate all sprites in Settings → System
Loading Videos to Channels
Assignment Methods
Keyboard Assignment (Fastest)
- Select a video in the grid (keyboard or mouse)
- Press 1-8 to assign to that channel
- Or press Space or Enter for smart assign (toggles between channels 1 and 2)
Drag and Drop
Drag a video thumbnail from the grid onto a channel fader to assign it.
Right-Click Menu
Right-click a video thumbnail for quick assign options.
Replacing Videos
Assigning a new video to a channel replaces the current video. The new video inherits the channel's current opacity and settings.
Clearing Channels
- Click the Clear button on a channel strip
- Use Clear All button (confirmation required)
- Keyboard: Select channel and press Delete or Backspace
Channel Controls
Each of the 8 channels has identical controls organized in a vertical strip.
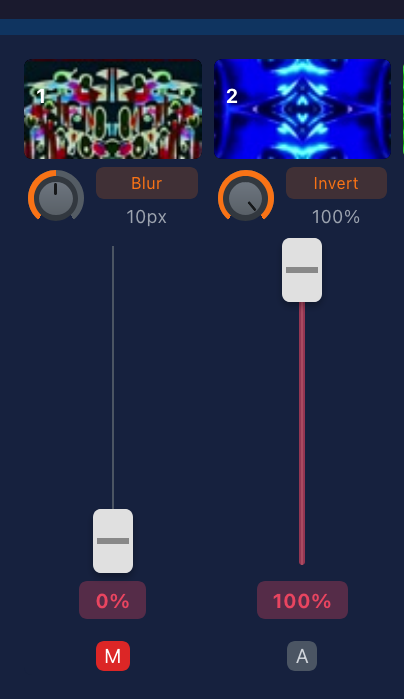
Opacity Fader
The main vertical fader controls channel visibility (0-100% opacity).
How to use:
- Drag: Click and drag fader up/down
- Scroll: Hover and scroll mouse wheel for fine adjustment
- Double-click: Smoothly fade to/from black (1 second transition)
Fader Settings:
- Reverse scroll direction: Settings → UI Controls → Reverse Scroll Faders
- Scroll sensitivity: Adjust multiplier 1-10 (fine to coarse)
Channel Mute
Mute button instantly sets opacity to 0% without changing fader position. Unmute restores previous opacity.
Video Preview
Live thumbnail preview of the loaded video. Disable in Settings → Performance to save resources.
Channel Effects Max
Apply per-channel effects for individual channel processing.
Available Effects:
- Color & Tone: Brightness, Contrast, Saturation, Hue Rotation, Invert, Posterize
- Stylize: Blur, Pixelate, Vignette, Film Grain
- Glitch & Retro: Chromatic Aberration, RGB Split, Scanlines, Strobe
- Playback: Speed (0.25x-4x), Reverse
Using Channel Effects:
- Click effect type dropdown
- Select effect from list
- Adjust effect amount with knob (drag or scroll)
- Toggle bypass to compare effect on/off
Channel Masks Max
Mask options for transparency and compositing.
Chroma Key (Green/Blue Screen)
- Color: Pick key color (green, blue, or custom)
- Similarity: How close colors must match (0-100%)
- Smoothness: Edge feathering (0-100%)
- Best for: Talent compositing, green screen footage
Luma Key (Brightness-based)
- Low Threshold: Remove dark areas
- High Threshold: Remove bright areas
- Invert: Flip the key
- Best for: Light effects, removing black backgrounds
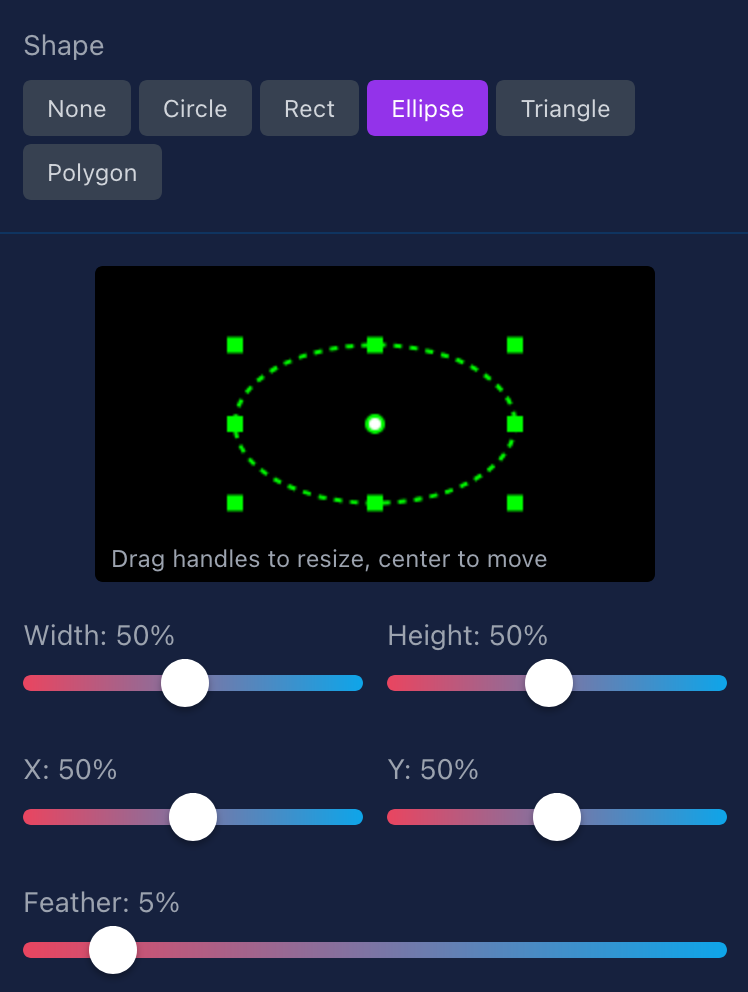
Shape Masks
Geometric shapes for precise masking:
- Shapes: Circle, Rectangle, Ellipse, Triangle, Polygon (up to 16 points)
- Edit: Drag points to adjust shape
- Feather: Soften edges
- Multiple Masks: Combine multiple shapes per channel
Audio Controls
Per-channel audio mixing (when audio is enabled):
- Volume Fader: Control channel audio level (0-100%)
- Mute: Silence this channel's audio
- Peak Meter: Visual feedback of audio level
Enable audio in Settings → Performance → Audio Enabled
Channel Settings
Click the gear icon on any channel to open Channel Settings. This panel provides quick access to channel configuration and history.
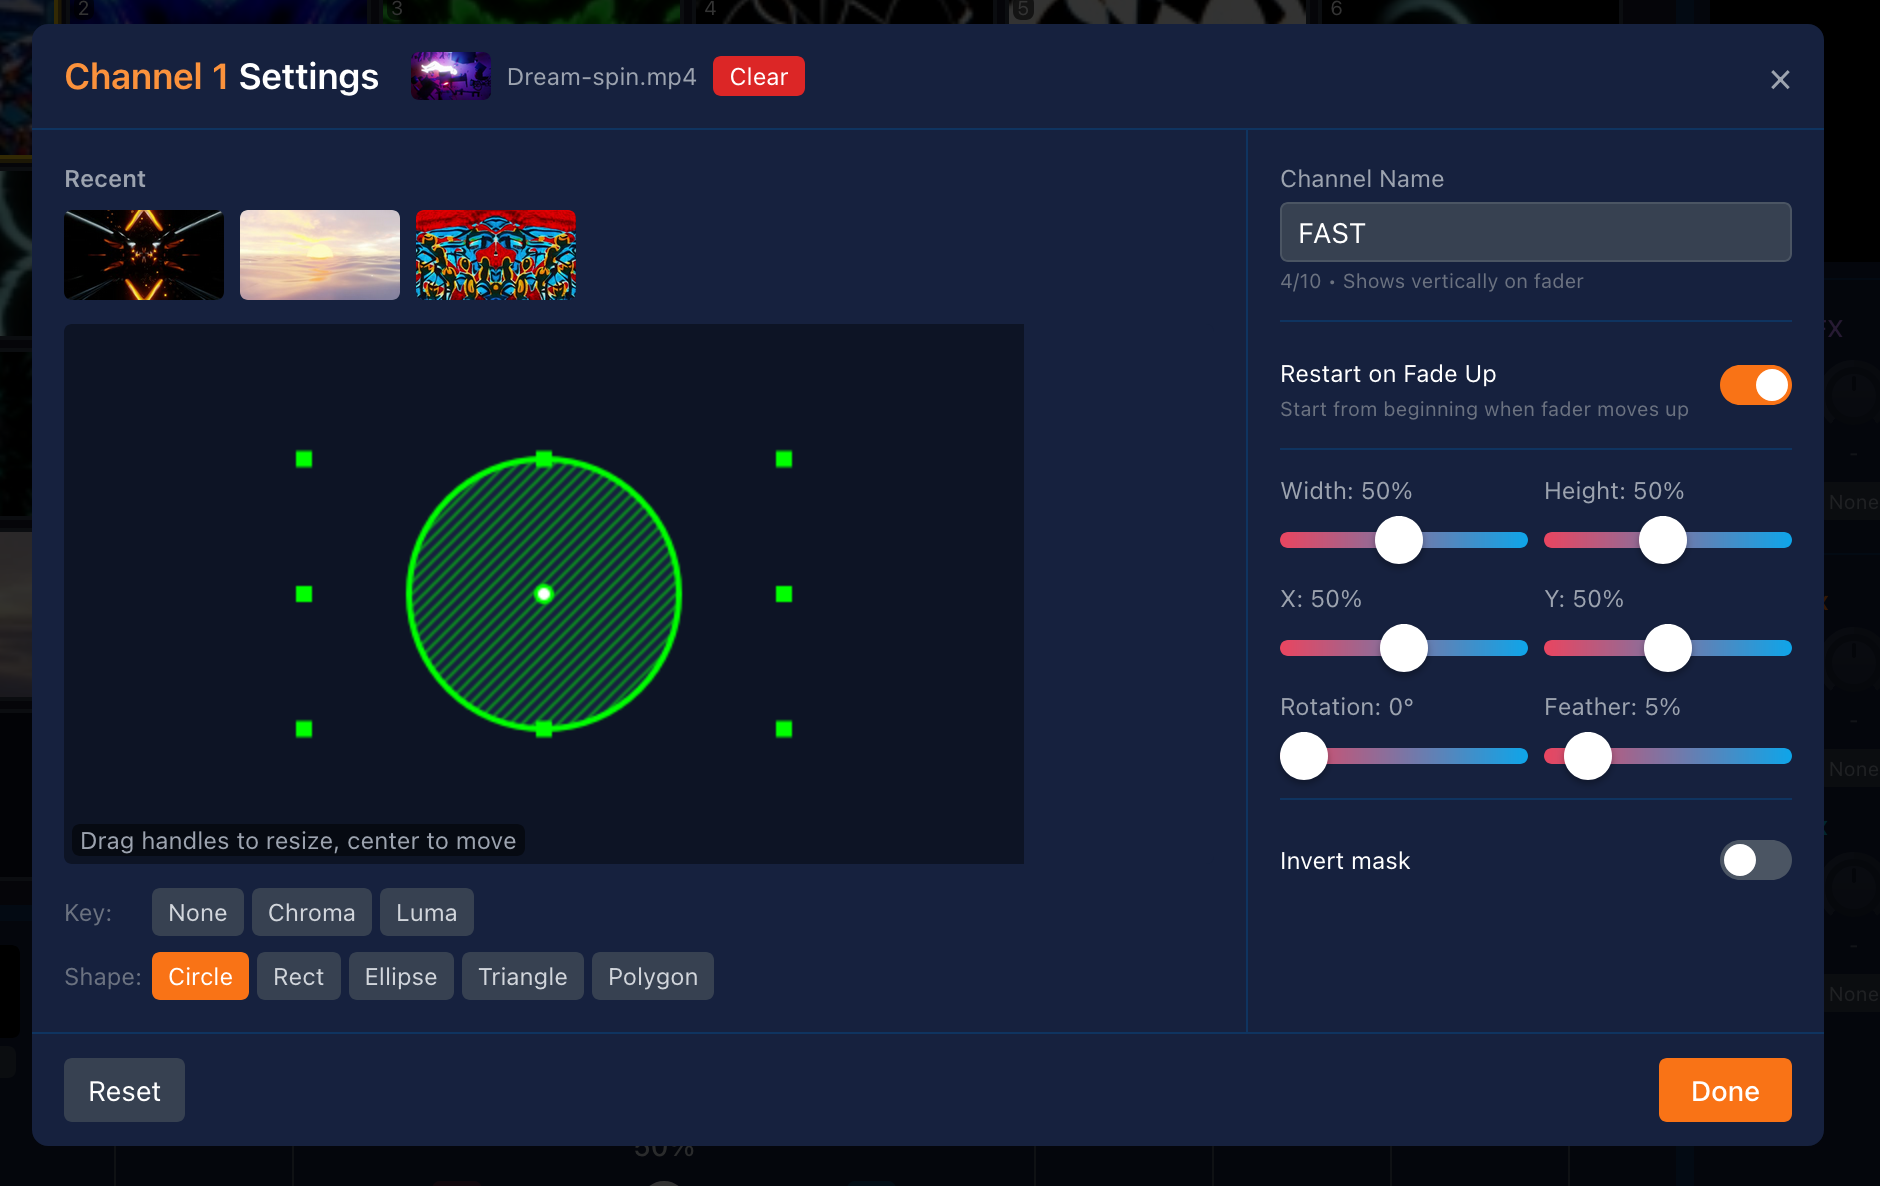
Recent Videos
Quick access to the 3 most recently loaded videos on this channel. Click any thumbnail to reload that video instantly.
Channel Name
Assign a custom name to identify the channel. Useful for organizing your mix when using multiple similar clips.
Restart on Fade Up
When enabled, the video automatically restarts from the beginning each time the channel fades up from zero opacity. Useful for intro clips or one-shot effects.
Quick Mask & Key Access
Direct access to mask and keying settings without navigating through multiple panels. Adjust chroma key, luma key, and shape masks from one location.
Crossfader & Bank Switching
The crossfader blends between Bank A (channels 1-4) and Bank B (channels 5-8) using transition effects.
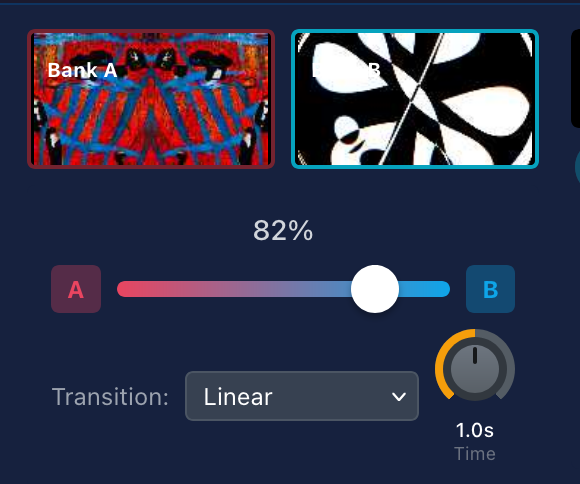
Crossfader Slider
- Left (0%): Bank A fully visible, Bank B hidden
- Center (50%): Both banks blended 50/50
- Right (100%): Bank B fully visible, Bank A hidden
Control Methods:
- Drag: Click and drag slider
- Scroll: Hover and scroll mouse wheel
- Keyboard: , to fade to Bank A, . to fade to Bank B
- Auto-fade buttons: Click A or B for smooth automatic transition
Transition Modes
Select how banks blend together during crossfade. 20+ modes available:
Blend Modes (Smooth color mixing)
- Linear: Simple opacity blend (default)
- Luminance: Brightness-based blend
- Additive: Add colors together (brighter)
- Dissolve: Random pixel dissolve
- Ripple: Water ripple effect
Wipe Modes (Geometric reveals)
- Left/Right/Up/Down: Directional wipes
- Diagonal: 4 diagonal directions (TL-BR, TR-BL, etc.)
- Clock: Circular clockwise wipe
Motion Modes (Movement-based)
- Push Left/Right: Push old content off screen
- Zoom In/Out: Scale transition
- Iris Open/Close: Circular expand/contract
Special Effects
- Page Turn: 3D page flip effect
- Cube Rotation: 3D cube spin

Transition Duration
Control how long auto-fades take:
- Range: 0-5000ms (0-5 seconds)
- Adjust with rotary knob (drag or scroll)
- Affects: Auto-fade buttons and keyboard shortcuts , .
- Manual slider movements are instant (follow your drag speed)
Bank Previews
Live composite previews show what each bank looks like before crossfading:
- Enable in Settings → Performance → Bank Preview Live
- Shows: All channels in that bank composited together
- Use to: Preview your next bank before transitioning
Bank Strategy
Common mixing approaches:
Prepare-and-Switch
Load Bank A with current content. While it plays, prepare Bank B with next content. Crossfade when ready.
A/B Comparison
Load two different looks in each bank. Quickly toggle between them for comparison or beat-matched switching.
Layered Mixing
Use center crossfader position to blend both banks equally for layered visuals.
Effects System
GRID has three effect layers: per-channel, per-bank, and output-level.
Bank Effects
Apply effects to entire banks (all channels in Bank A or Bank B together).
- Lite tier: 1 effect slot per bank
- Max tier: Up to 4 effect slots per bank
- Configure slot count: Settings → Grid & Channels → Effect Slots
Using Bank Effects:
- Open Bank Effects panel (below crossfader)
- Select effect type from dropdown
- Adjust effect amount with knob
- Toggle bypass to A/B compare
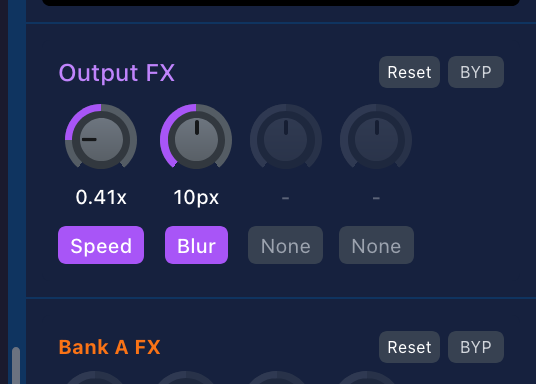
Output Effects Max
Master output effects applied after banks are composited together.
- Up to 4 effect slots
- Affects final output sent to projection/stream
- Best for: Color grading, final vignette, global adjustments
Effect Order
Effects are applied in this order:
- Channel Effects → Each channel processed individually Max
- Channel Masks → Transparency applied per channel Max
- Bank Compositing → Channels combined into Bank A and Bank B
- Bank Effects → Applied to each bank's composite
- Crossfader → Banks blended with transition
- Output Effects → Final master effects Max
- Output Mask → Final transparency mask Max
Effect Parameters
Most effects have a single amount/intensity parameter (0-100%). Some have multiple:
| Effect | Primary Parameter | Secondary |
|---|---|---|
| Blur | Radius (0-20px) | - |
| Brightness | Amount (0-200%) | - |
| Contrast | Amount (0-200%) | - |
| Saturation | Amount (0-200%) | - |
| Hue Rotation | Degrees (0-360°) | - |
| Speed | Playback rate (0.25x-4x) | - |
Performance Impact
Effects are GPU-accelerated but have varying performance costs:
- Low cost: Brightness, Contrast, Saturation, Hue, Invert
- Medium cost: Vignette, Posterize, Pixelate, Chromatic Aberration
- High cost: Blur (especially large radius), Film Grain
Reduce effect slots or disable unused effects if experiencing performance issues.
Output Window
The Output window is where GRID renders the final composited video. This is what you project or stream.
Opening Output
Click Output button in the header. A new browser window opens at http://localhost:3000/output
Fullscreen Mode
- Press F or click fullscreen button
- Send to external display/projector via browser window controls
- Exit fullscreen with Esc
Output Resolution
Configure in Settings → Output → Output Resolution:
- 720p: 1280×720 (lowest GPU load)
- 1080p: 1920×1080 (recommended)
- 1440p: 2560×1440
- 2K: 2048×1080
- 4K: 3840×2160 (requires powerful GPU)
- Native: Full display resolution
Target Framerate
Set output FPS in Settings → Output → Output Framerate:
- 24fps: Cinematic look, lowest GPU load
- 30fps: Standard video
- 60fps: Smooth motion, highest GPU load
Test Pattern
Display test patterns for output alignment and calibration:
- Enable in Settings → Output → Test Pattern
- Patterns: Color Bars, Grid, Solid colors, Checkerboard
- Use for: Display calibration, projector alignment, testing aspect ratio
Debug Overlay
Show performance metrics on output screen:
- Enable in Settings → Output → Debug overlay
- Shows: FPS, resolution, dropped frames
- Use for: Troubleshooting performance issues
Output Masks Max
Output masks define transparency for the entire final output. Use for custom projection shapes, edge blending, or masking to venue-specific screens.
Opening Mask Editor
Click Output Mask button in the output preview area.
Shape Types
- Circle: Circular projection (e.g., planetarium domes)
- Rectangle: Rectangular crop
- Ellipse: Oval shapes
- Triangle: Three-sided mask
- Polygon: Custom shape with up to 16 points
Editing Masks
- Select shape type
- Drag points on canvas to adjust shape
- Add points (polygon mode): Click on edge
- Remove points: Right-click point
- Adjust feather slider to soften edges
Multiple Masks
Combine multiple shapes for complex projections:
- Add mask button to create additional shapes
- Toggle each mask on/off independently
- Useful for: Multi-screen installations, irregular venue shapes
Common Use Cases
Circular Projections
Use Circle mask for dome or circular screen projections. Adjust feather for soft edge blending.
Edge Blending
Use Rectangle with high feather value to create soft edges for multi-projector overlap zones.
Custom Venue Shapes
Use Polygon to mask exact shape of irregular screens or architectural projections.
Audio System
GRID supports audio mixing when audio is enabled. Audio from video files can be mixed alongside visual content.
Enabling Audio
Audio is toggled in Settings → Performance → Audio Enabled
- Enabled: Audio plays from videos, controls visible
- Disabled: All audio muted, controls hidden, saves CPU
Per-Channel Volume
Each channel has independent audio controls:
- Volume Fader: 0-100% audio level
- Mute Button: Instantly silence this channel
- Peak Indicator: Visual feedback of audio level
Master Audio Controls
- Master Volume: Control overall output level
- Master Mute: Silence all audio instantly
- Located in the output preview area
VU Meters
Visual audio level monitoring:
- Enable in Settings → Performance → Audio Meter (VU)
- Shows: Stereo levels (L/R channels)
- Peak indicators: Flash red when clipping
- Located: Next to master volume control
Audio Ducking
When crossfading between banks, audio automatically crossfades as well:
- Bank A at 100%: Only Bank A audio plays
- Crossfader at 50%: Both banks' audio at 50%
- Bank B at 100%: Only Bank B audio plays
Performance Mode
For video-only performances, disable audio to save CPU:
- Go to Settings → Performance
- Uncheck Audio Enabled
- Audio processing stops, controls hidden
- Can improve framerate on lower-end systems
Keyboard Shortcuts
Keyboard shortcuts enable fast operation during live performance. Press ? in the Controller to view the shortcuts panel.
Grid Navigation
| Shortcut | Action |
|---|---|
| A-I | Select grid column (first keypress) |
| 1-9 | Select grid row (second keypress completes selection) |
| ↑ ↓ ← → | Navigate selected cell |
| Esc | Clear selection |
Channel Assignment
After selecting a video in the grid:
| Shortcut | Action |
|---|---|
| 1-8 | Assign to specific channel |
| Space or Enter | Smart assign (toggles between channels 1 and 2) |
| Delete / Backspace | Clear selected channel |
Deck Switching
| Shortcut | Action |
|---|---|
| Shift+1 | Switch to Deck 1 |
| Shift+2 | Switch to Deck 2 |
| Shift+3 | Switch to Deck 3 |
Crossfader Control
| Shortcut | Action |
|---|---|
| , or < | Auto-fade to Bank A (smooth 1s transition) |
| . or > | Auto-fade to Bank B (smooth 1s transition) |
Global
| Shortcut | Action |
|---|---|
| ? | Show keyboard shortcuts help panel |
| F (in Output) | Toggle fullscreen |
Example Workflow
Load video from grid cell D3 to channel 5:
- Press D (select column D)
- Press 3 (select row 3, grid cell D3 is now selected)
- Press 5 (assign to channel 5)
Then fade to Bank B:
- Press . (auto-fade to Bank B)
MIDI Controllers Experimental
Connect MIDI controllers (faders, knobs, buttons) for tactile control of GRID. Requires Web MIDI API support (Chrome, Edge, Opera).
Browser Support
- Supported: Chrome, Edge, Opera
- Not supported: Firefox, Safari
Connecting MIDI Controllers
- Connect MIDI controller via USB
- Open Settings → MIDI
- Toggle Enable MIDI
- Grant browser permission when prompted
- Connected devices appear in the list (green indicator)
MIDI Learn Mode
Map MIDI controls to GRID parameters:
- Right-click any control in GRID (fader, knob, button)
- Select MIDI Learn
- Move or press the MIDI control you want to map
- Mapping is saved automatically
- Right-click again to remove mapping
Mappable Controls
Continuous (Faders/Knobs)
- Channel opacity (all 8 channels)
- Channel volume (all 8 channels)
- Crossfader position
- Bank effect parameters
- Output effect parameters
- Master volume
Discrete (Buttons/Pads)
- Channel mute toggle
- Clear channel
- Effect bypass toggle
- Master mute toggle
- Auto-fade to Bank A/B
LED Feedback
Controllers with LED feedback receive visual updates:
- Select output device in Settings → MIDI
- GRID sends MIDI messages back to controller
- LEDs reflect current values (e.g., fader position, mute state)
- Useful for: Motorized faders, LED rings, button lights
Compatible Controllers
Any MIDI controller works, but these are commonly used:
- Akai APC40/APC Key 25: Faders, knobs, grid pads
- Novation Launch Control: Compact knobs and faders
- Korg nanoKONTROL: Affordable fader bank
- Behringer X-Touch: Motorized faders with feedback
- Any MIDI device: If it sends CC or Note messages, it works
Managing Mappings
View and edit mappings in Settings → MIDI:
- See all active mappings
- Device, control number, mapped parameter
- Select feedback output device per mapping
- Remove unwanted mappings
Stream Deck & OSC Experimental
Elgato Stream Deck
Turn your Stream Deck into a dedicated video mixing surface with visual feedback.
Browser Support
- Supported: Chrome, Edge, Chromium-based browsers
- Requires: WebHID API support
Compatible Devices
- Stream Deck MK.2
- Stream Deck XL
- Stream Deck Mini
- Stream Deck + (includes rotary encoders)
Connecting Stream Deck
- Open Settings → Stream Deck
- Toggle Enable Stream Deck
- Click Connect Stream Deck
- Select device from browser prompt
- Device appears in connected list
Button Mapping
Similar to MIDI Learn:
- Right-click a GRID control
- Select Stream Deck Learn
- Press the Stream Deck button you want to map
- Mapping saved automatically
Mappable Actions
- Clear channel: Remove video from channel
- Toggle mute: Mute/unmute channel
- Auto-fade to bank: Smooth crossfade to A or B
- Effect bypass: Toggle effect on/off
- Master mute: Mute entire output
Visual Feedback
Stream Deck buttons can display:
- Color: Solid color based on action state
- Channel thumbnail: Show which video is loaded (color indicator)
- Bank preview: Bank A/B color coding
- Updates in real-time as you mix
OSC (Open Sound Control)
Network-based control protocol for custom controllers and software integration.
Enabling OSC
- Open Settings → OSC
- Toggle Enable OSC
- Note the port number (default: 9000)
Compatible Clients
- TouchOSC: iOS/Android custom controller app
- Lemur: iOS advanced controller builder
- OSCulator: macOS OSC routing
- Any OSC client: Send UDP messages to GRID's port
OSC Addresses
Common control addresses:
/channel/1-8/opacity- Float 0.0-1.0/channel/1-8/volume- Float 0.0-1.0/crossfader- Float 0.0-1.0 (0=Bank A, 1=Bank B)/bank/a|b/effect/1-4/value- Float 0.0-1.0/output/effect/1-4/value- Float 0.0-1.0
Bi-directional Feedback
OSC supports two-way communication:
- Send commands to GRID from your controller
- GRID sends state updates back to controller
- Controllers stay in sync with GRID's current state
- Loop prevention: Triggering client doesn't receive its own echo
Presets
Presets save complete mixer states for instant recall. Perfect for planned performances or starting points.
Server Storage: Presets are saved to the Server node, not locally. This means all connected controllers can view and load the same presets, making it easy to share configurations across your setup.
What Presets Save
A preset captures:
- All channel video assignments
- Channel opacity fader positions
- Channel effects and parameters
- Channel masks and settings
- Bank effects and parameters
- Output effects and parameters
- Crossfader position
- Audio levels (channel and master)
Presets do NOT save:
- Grid size or settings
- Hardware mappings (MIDI, Stream Deck)
- Performance settings
- License or system settings
Creating a Preset
- Set up your mixer (load videos, set faders, apply effects)
- Click Presets in the header
- Click Save Preset
- Enter a name (e.g., "Opening Set", "Slow Build", "Finale")
- Click Save
Loading a Preset
- Click Presets in the header
- Select preset from list
- Click Load
- Mixer instantly updates to saved state
Managing Presets
- Rename: Click preset name to edit
- Delete: Click delete button (requires confirmation)
- Duplicate: Load preset, modify, save with new name
Preset Strategy
Performance Planning
Create presets for each section of your performance. Load them in sequence as your set progresses.
Starting Points
Save "templates" with common effect chains or channel setups. Load as starting point, then customize.
A/B Testing
Save variations of the same mix. Load each to compare different looks quickly.
Recording Max
Record your mixed output to video file for later playback or sharing.
Requirements
- GRID Max license
- Output window must be open and connected
- Sufficient disk space for video files
Starting a Recording
- Open Output window
- In Controller, click Record button in header
- Recording starts immediately
- Duration counter shows elapsed time
- Red recording indicator pulses in header
Stopping Recording
- Click Record button again to stop
- Recording saves automatically
- File location shown in notification
Recording Settings
Configure in Settings → Recordings:
- Output Format: WebM, MP4 (codec depends on browser)
- Quality: Bitrate selection for file size vs. quality
- Resolution: Matches current output resolution
- Framerate: Matches target FPS setting
- Save Location: Default recordings folder
Managing Recordings
View recordings in Settings → Recordings:
- List of all recordings with duration and size
- Preview playback
- Delete unwanted recordings
- Open recordings folder
Performance Impact
Recording uses additional CPU/GPU resources:
- May reduce output framerate on lower-end systems
- Lower resolution/framerate settings reduce impact
- Monitor FPS counter during recording
- Test before live performance to ensure acceptable performance
Multi-Output Setup
Run multiple output windows for backup displays or distributed projection setups.
Master/Secondary Architecture
GRID uses a master/secondary model:
- Master Output: Handles video caching, preview streaming, performance stats
- Secondary Outputs: Render-only, no extra processing
- Only one master at a time (reduces server load)
- Unlimited secondary outputs
Opening Multiple Outputs
- Click Output button (first output becomes master)
- Open another browser window/tab to
/output - Additional outputs connect as secondary
- View all connected outputs in Settings → Outputs
Switching Master Output
Change which output is the master:
- Go to Settings → Outputs
- See list of all connected outputs
- Click Set Master next to desired output
- Master designation transfers immediately
Use Cases
Backup Display
Run two outputs to separate displays. If main projector fails, switch to backup without interruption.
Multi-Screen Installation
Send same content to multiple screens/projectors. Useful for large venues or art installations.
Distributed Setup
Run outputs on different machines across network. Server on one machine, outputs on others.
Network Requirements
For best performance in distributed setups:
- Recommended: Gigabit Ethernet between machines
- Avoid: WiFi for output machines (latency, bandwidth)
- Controller: Can run on WiFi (less critical)
- Same Network: All devices must be on same local network
Identifying Outputs
Enable output identification to see which screen is which:
- Go to Settings → Outputs
- Toggle Identify Outputs
- Output ID and status overlay appears on all output screens
- Use to verify which output is which before performance
Settings & Configuration
Access Settings by clicking the Settings button in the header.
Grid & Channels
- Grid Size: Rows and columns (1-9, limited by license)
- Grid Decks: Number of deck pages (1-3)
- Mixer Channels: Channels per bank (1-4)
- Effect Slots: Number of effect slots per bank (0-4)
Output
- Output Framerate: 24fps, 30fps, or 60fps
- Output Resolution: 720p through 4K or Native
- Test Pattern: Display calibration patterns
- Debug Overlay: Show FPS and metrics on output
Outputs
- View all connected output windows
- Switch master output designation
- Identify outputs (show ID overlay)
UI Controls
- Reverse Scroll Faders: Invert mouse wheel direction
- Scroll Sensitivity: Multiplier 1-10 (fine to coarse)
- Touch Friendly Mode: Larger hit targets for tablets
- Gesture Sensitivity: Touch gesture responsiveness
- Apply to All Devices: Sync UI settings to all controllers
MIDI
- Enable/disable MIDI support
- View connected input/output devices
- Manage MIDI mappings
- Configure LED feedback devices
Stream Deck
- Enable/disable Stream Deck
- Connect/disconnect devices
- Manage button mappings
- Configure button feedback styles
OSC
- Enable/disable OSC server
- View port and connection info
- OSC address reference
Recordings Max
- Recording format and quality settings
- Save location
- List of recordings with playback
- Delete recordings
Performance
- Grid Preview Live: Animated sprite sheets in grid
- Channel Preview Live: Video previews on channel strips
- Bank Preview Live: Live bank composite previews
- Output Preview Live: Live output preview on controller
- Audio Enabled: Enable audio processing and controls
- Audio Meter (VU): Show VU meter visualization
- Apply to All Devices: Sync performance settings to all controllers
System
- Version: Current GRID version
- Video Cache: Preload status (output browser cache)
- Regenerate Sprites: Rebuild all sprite sheets
- License: Current tier, trial status, upgrade options
- Device ID: Unique identifier for license activation

Data Storage
The Server Node stores all your videos, presets, and settings in a user data folder. This folder is separate from the application itself, so your data persists across updates.
Storage Locations
macOS
~/Library/Application Support/GRID/Windows
%APPDATA%\GRID\Usually: C:\Users\YourName\AppData\Roaming\GRID\
Linux
~/.config/GRID/Folder Structure
GRID/
├── public/videos/       - Your video files
├── public/thumbnails/   - Generated thumbnails and sprite sheets
├── public/recordings/   - Recorded videos (Max tier)
├── uploads/             - Temporary upload processing
└── configs/ - Presets and settingsTip: You can also set a custom video folder in Settings → Media → Video Folder to use videos from any location on your system.
Upgrading GRID
GRID automatically checks for updates when you launch the app. If a new version is available, you'll see a notification with a download link.
Manual Upgrade Process
- Download the new version from gridvideo.net/download
- Close GRID completely (quit the application)
- Replace the old app with the new one:
- macOS: Replace GRID.app in your Applications folder
- Windows: Extract the new .zip and replace your GRID folder
- Linux: Replace the old .AppImage with the new one
- Launch the new version
Your videos, presets, and settings are stored separately in the user data folder, so they will be preserved when upgrading.
Uninstalling GRID
To completely remove GRID and all user data:
Step 1: Delete the Application
- macOS: Delete GRID.app from your Applications folder
- Windows: Delete the extracted GRID folder
- Linux: Delete the .AppImage file
Step 2: Delete User Data (Optional)
If you want to remove all videos, presets, and settings:
- macOS:
rm -rf ~/Library/Application\ Support/GRID - Windows: Delete
%APPDATA%\GRIDfolder - Linux:
rm -rf ~/.config/GRID
Warning: Deleting the user data folder will permanently remove all your videos, presets, and settings. Back up any files you want to keep!
Performance Monitoring
GRID provides real-time performance metrics to ensure smooth operation.
Performance Indicators
Located in the Controller header:
- FPS Counter: Current framerate (green = good, red = issues)
- Dropped Frames: Number of frames dropped (should be near 0)
- Connection Status: Green dot = connected, red = disconnected
Performance Panel
Click the performance indicator to open detailed metrics:
- Current FPS
- Frame time (ms per frame)
- Total dropped frames
- Memory usage (Chrome only)
- Output connection status
Optimization Tips
Reduce Output Resolution
Lower resolution = less GPU load. Try 720p instead of 1080p.
Lower Target Framerate
24fps or 30fps uses less resources than 60fps. Cinematic content looks good at 24fps.
Disable Unused Previews
In Settings → Performance:
- Disable Grid Preview if you know your library
- Disable Channel Preview during performance
- Disable Bank/Output Preview if not needed
Reduce Effect Slots
Fewer effects = better performance. Set to 1-2 slots if not using many effects.
Disable Audio
If not using audio, disable it in Settings → Performance to save CPU.
Close Other Applications
Give GRID's output browser dedicated GPU access. Close other GPU-intensive apps.
Hardware Acceleration
Ensure browser hardware acceleration is enabled:
- Chrome:
chrome://settings→ System → Use hardware acceleration - Edge:
edge://settings→ System → Use hardware acceleration
Video File Optimization
- Use H.264 codec (best browser support)
- Match video resolution to output resolution
- Consistent framerates (30fps or 60fps)
- Avoid extremely large files (>500MB per video)
Common Issues
Connection Issues
Controller Can't Connect to Server
- Verify server is running (check terminal/console)
- Check firewall isn't blocking port 3000
- Try accessing
http://localhost:3000/controldirectly - On network devices, use server's IP instead of localhost
Output Window Won't Connect
- Refresh output page
- Check WebSocket connection in browser console
- Verify no browser extensions blocking WebSocket
- Try different browser (Chrome recommended)
MIDI Controller Not Detected
- Use Chrome, Edge, or Opera (Firefox/Safari don't support Web MIDI)
- Grant browser permission when prompted
- Check MIDI device is connected and powered
- Try unplugging and reconnecting device
- Restart browser
Video Issues
Video Won't Play
- Check file codec (H.264 has best browser support)
- Try a different video to isolate issue
- Check browser console for errors
- Re-encode video with standard codec (FFmpeg/HandBrake)
Video Stutters or Lags
- Lower output resolution
- Reduce target FPS to 30 or 24
- Check video file size (very large files may lag)
- Ensure output browser window is visible/active
- Close other GPU-intensive applications
Sprite Sheets Not Generating
- Check server logs for errors
- Verify FFmpeg is installed (required for sprite generation)
- Manually regenerate: Settings → System → Regenerate Sprites
- Check file permissions on video folder
Audio Issues
No Audio Output
- Check Settings → Performance → Audio Enabled
- Verify master volume isn't muted or at 0%
- Check channel volume levels
- Ensure browser tab isn't muted (right-click tab)
- Verify system audio output device
Audio Clipping/Distortion
- Check VU meter for red peaks
- Lower channel volumes
- Reduce master volume
- Check source video audio levels
Effect Issues
Effects Not Visible
- Check effect bypass isn't enabled
- Increase effect amount parameter
- Verify channel opacity is above 0%
- Check crossfader position (bank may be hidden)
Effects Causing Performance Drop
- Reduce effect slot count
- Remove high-cost effects (blur with large radius)
- Lower output resolution
- Check GPU usage in system monitor
Getting Help
If issues persist:
- Check browser console for error messages (F12 → Console)
- Review server logs in terminal
- Note: GRID version, OS, browser, GPU model
- Report issues at GitHub repository
- Include error messages and steps to reproduce
Keyboard Shortcuts Reference
| Shortcut | Action | Category |
|---|---|---|
| A-I | Select grid column | Grid Navigation |
| 1-9 | Select grid row (or assign to channel when video selected) | Grid Navigation / Channel Assignment |
| ↑ ↓ ← → | Navigate selected grid cell | Grid Navigation |
| Esc | Clear grid selection | Grid Navigation |
| Space | Quick assign video (toggles between channels 1 and 2) | Channel Assignment |
| Enter | Quick assign video (same as Space) | Channel Assignment |
| Delete / Backspace | Clear selected channel | Channel Control |
| Shift+1 | Switch to Grid Deck 1 | Deck Switching |
| Shift+2 | Switch to Grid Deck 2 | Deck Switching |
| Shift+3 | Switch to Grid Deck 3 | Deck Switching |
| , or < | Auto-fade to Bank A | Crossfader |
| . or > | Auto-fade to Bank B | Crossfader |
| ? | Show keyboard shortcuts help panel | Help |
| F (in Output window) | Toggle fullscreen | Output Control |
Effects Reference
All effects are GPU-accelerated and run in real-time. Max indicates effects available in per-channel and output slots (Max tier only).
| Effect | Parameter Range | Description | Best For |
|---|---|---|---|
| Blur | 0-20px | Gaussian blur softens image | Backgrounds, dreamy looks, depth |
| Brightness | 0-200% | Adjust overall luminance | Exposure correction, fades |
| Contrast | 0-200% | Difference between light/dark | Punch, dramatic looks |
| Saturation | 0-200% | Color intensity (0=grayscale) | Vibrant colors, B&W conversion |
| Hue Rotation | 0-360° | Shift all colors around wheel | Color variations, psychedelic |
| Invert | 0-100% | Color negative effect | Negative film look, contrast |
| Posterize | 2-16 levels | Reduce color depth | Poster art, stylized graphics |
| Pixelate | 1-100 | Low-res mosaic effect | Retro gaming, censoring, style |
| Vignette | 0-200% | Darken edges, brighten center | Focus, vintage photography |
| Film Grain | 0-100% | Add noise for film texture | Vintage film, organic feel |
| Chromatic Aberration | 0-20px | Separate RGB channels | Lens distortion, glitch |
| RGB Split | 0-50px | Offset color channels | Glitch aesthetic, VHS |
| Scanlines | 0-100% | CRT television scanlines | Retro monitors, 80s look |
| Strobe | 1-60 Hz | Rapid flashing on/off | Intense energy, seizure warning! |
| Speed Max | 0.25x-4x | Playback rate control | Slow motion, time lapse |
| Reverse Max | On/Off | Play video backwards | Rewind effects, loops |
Transition Modes Reference
20+ transition modes for crossfading between Bank A and Bank B.
| Transition | Category | Description | Best For |
|---|---|---|---|
| Linear | Blend | Simple opacity crossfade | General purpose, subtle transitions |
| Luminance | Blend | Brightness-based blend | Light/dark content transitions |
| Additive | Blend | Add colors together (brighter) | Light effects, energy builds |
| Dissolve | Blend | Random pixel fade | Organic, film-like transitions |
| Ripple | Blend | Water ripple distortion | Dream sequences, fluid motion |
| Wipe Left | Wipe | Reveal from left to right | Directional transitions |
| Wipe Right | Wipe | Reveal from right to left | Directional transitions |
| Wipe Up | Wipe | Reveal from bottom to top | Rising motion |
| Wipe Down | Wipe | Reveal from top to bottom | Falling motion |
| Diagonal TL-BR | Wipe | Top-left to bottom-right | Dynamic angles |
| Diagonal TR-BL | Wipe | Top-right to bottom-left | Dynamic angles |
| Clock Wipe | Wipe | Circular clockwise reveal | Time-based transitions |
| Push Left | Motion | Slide old content off to left | Scene changes, slides |
| Push Right | Motion | Slide old content off to right | Scene changes, slides |
| Zoom In | Motion | New content scales up from center | Focus, importance |
| Zoom Out | Motion | Old content scales down to center | Perspective, departure |
| Iris Open | Motion | Circular expand from center | Spotlight, reveal |
| Iris Close | Motion | Circular contract to center | Ending, focus |
| Page Turn | Special | 3D page flip effect | Book pages, chapters |
| Cube Rotation | Special | 3D cube spin transition | Dramatic reveals, 3D feel |
FAQ
General
Can I use GRID offline?
Yes, once installed. Server, Controller, and Output all run locally. Internet only needed for initial download, updates, and license activation.
Does GRID work on Linux?
Yes. GRID runs on Windows, macOS, and Linux. Browser-based interface works the same across platforms.
Can I control GRID from my phone?
Yes. Open the Controller URL in your mobile browser. Touch-friendly mode (Settings → UI Controls) enlarges controls for easier mobile use.
Video Library
What video formats are supported?
Browsers support: MP4 (H.264), WebM (VP8/VP9). H.264 MP4 has best compatibility. Use FFmpeg or HandBrake to convert unsupported formats.
Can I organize videos into folders?
Yes. The Media Manager supports folder structure. Organize your videos folder however you like.
How do I delete videos from the library?
Delete video files from your videos folder. GRID rescans automatically or restart server to refresh library.
Performance
What GPU do I need?
Dedicated GPU recommended. NVIDIA or AMD with 2GB+ VRAM for 1080p. Integrated graphics may work at lower resolutions (720p, fewer effects).
Why is my framerate dropping?
- Lower output resolution (Settings → Output)
- Reduce target FPS to 24 or 30
- Disable previews (Settings → Performance)
- Reduce effect slots
- Close other GPU applications
Can I run multiple instances of GRID?
No. One server instance per machine. But you can have multiple controllers and outputs connected to one server.
Hardware Controllers
Do I need special drivers for MIDI controllers?
Usually no. USB MIDI controllers are class-compliant. Plug in and use. Some advanced features (LED feedback) may need device-specific drivers.
Can I use multiple MIDI controllers at once?
Yes. Connect multiple MIDI devices. Each shows up in Settings → MIDI. Map controls from any connected device.
Does Stream Deck require Elgato software?
No. GRID connects directly via WebHID. You don't need Stream Deck software running (but it won't interfere if installed).
Licensing
What happens when my trial expires?
After 7 days, GRID reverts to Lite tier. Your Max features (extra effects, recordings, etc.) become unavailable but your project remains intact.
Can I transfer my license to another machine?
Yes. Deactivate license on current machine (Settings → System → License), then activate on new machine using same license key.
How many machines can use one Max license?
One active machine at a time. You can transfer between machines but only one can run GRID Max simultaneously.
Troubleshooting
Output window is black/not rendering
- Check channel opacity faders are above 0%
- Verify crossfader position (may be hiding both banks)
- Ensure videos are loaded to channels
- Check browser console for WebGL errors
- Verify GPU/hardware acceleration is enabled in browser
Videos load but don't play
- Check playback isn't paused (should auto-play)
- Verify video codec (H.264 recommended)
- Check browser console for decode errors
- Try re-encoding with standard settings
Controller lost connection to server
- Check server is still running
- Verify network connection
- Refresh browser page
- Check firewall settings